How to Create a White Background in Photoshop: Tutorial
Learn how to make a background white in Photoshop, step-by-step.
By

Putting your product against a white background has become the standard for ecommerce. White background product images create consistency, giving your website a clean, organized look. White backgrounds also allow shoppers to see your products’ true colors and features more easily. Plus, many third-party marketplace sites require your product photos to have a white background.
It’s ideal to shoot using a white background when shooting your photos, but this isn’t always possible. If your product photos aren’t shot against a white background, you don’t need to reshoot your images. In this tutorial, we’ll show you how to create a white background in Photoshop in just a few easy steps.
How to make a white background in Photoshop
Scroll down for the written tutorial.
1. Select your product
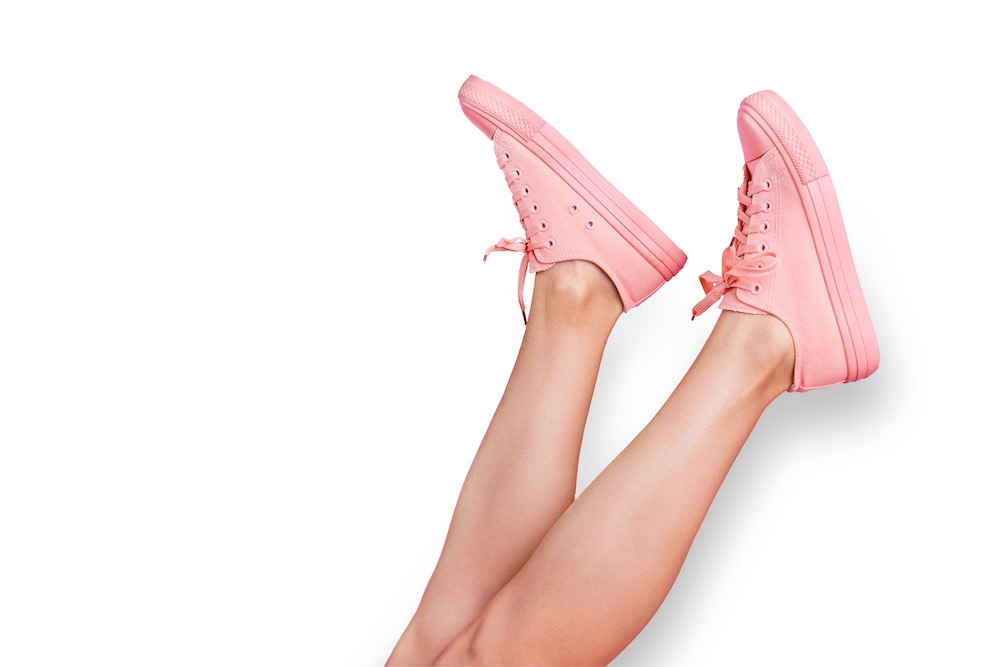
For this tutorial, we’ll be using the following image in Photoshop (click to open and download in a new tab):

You’ll note this image already has a solid color background. However, the method we’re about to use will allow you to make a white background on any product photo in Photoshop, regardless of the original background. You don’t need to change the background color or make it solid before you begin.
To get started, choose the Magic Wand Tool from the Toolbar at the left side of the screen. Once you’ve selected this tool, you’ll note you have specific choices in the Option Bar at the top of the screen. Click on the button called Select and Mask….
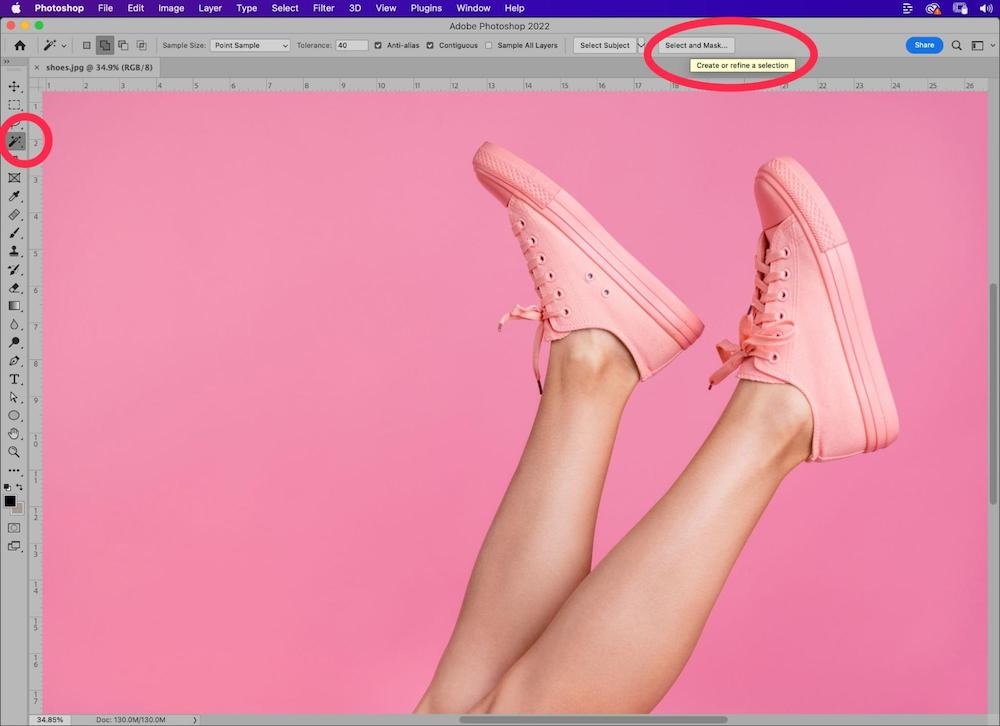
Once in the Select and Mask… window, choose Select Subject.
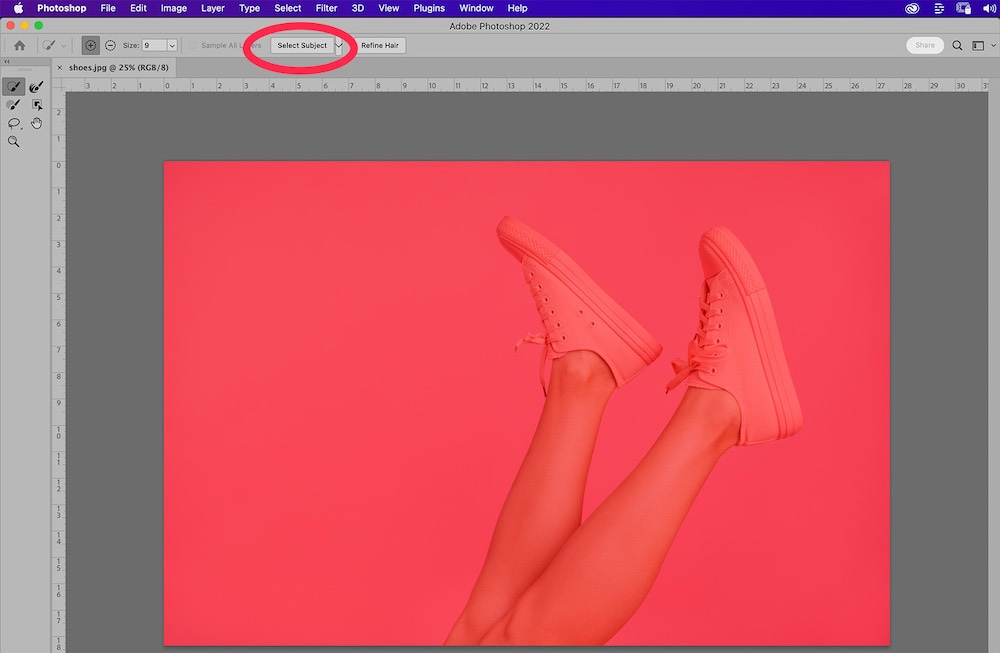
Photoshop will create a selection of your product within the image. All areas that are not part of the selection will have a dark red overlay. However, it may not be a perfect selection. You can zoom in and use the tools on the left and upper sides of the window to refine the selection further. You can also adjust the size of the brush you use to control the selection, and whether you’re subtracting or adding pixels to the selection, using the brush tools at the top of the window.
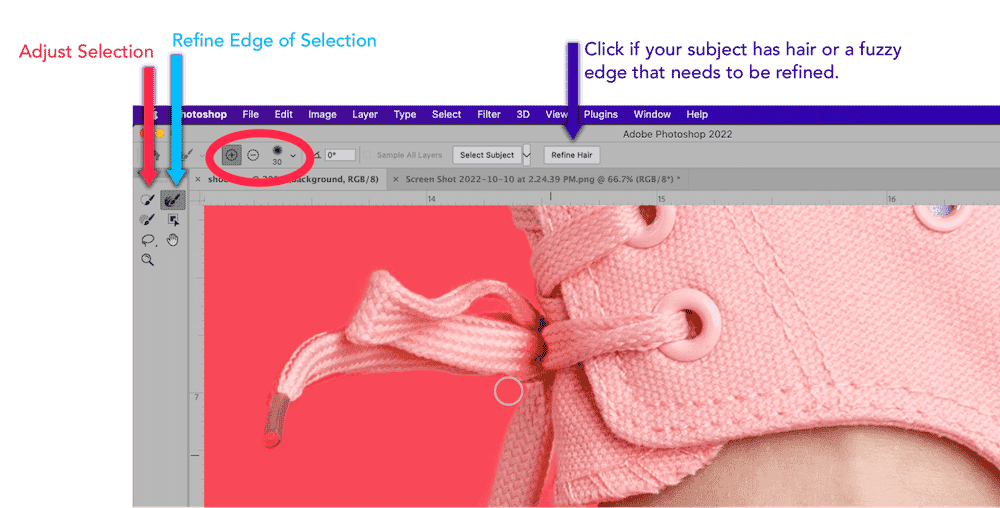
Once you’re satisfied with your selection, click OK. If you’re working on a Mac laptop, the OK button may be highlighted in the Touch Bar on your keyboard.
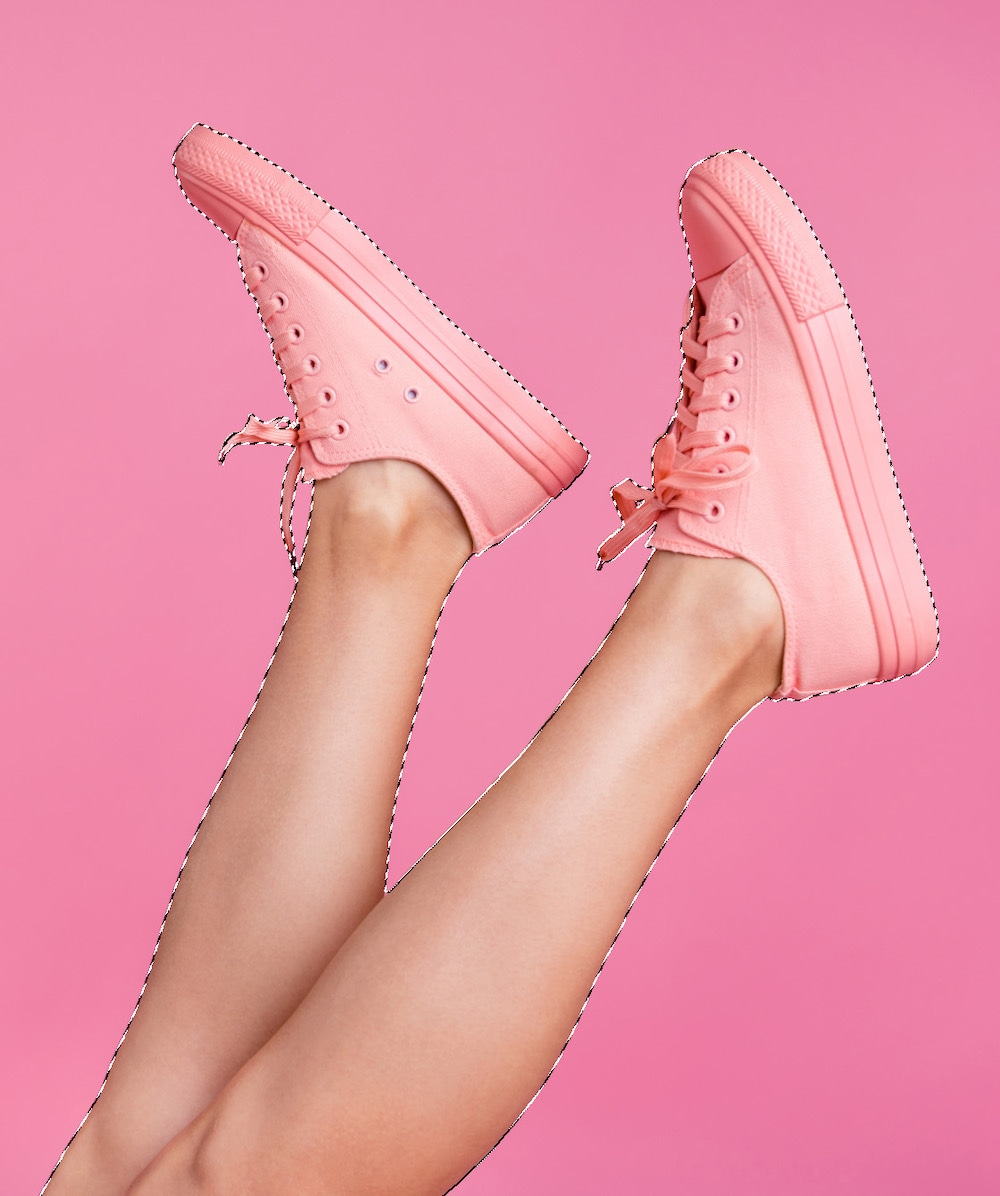
You’ll see your image with the marching ants selection border around the product.
2. Create a mask
Because we want our process to be non-destructive, we want to duplicate our Background layer before we go further.
Note: If you’re working with an image that has multiple layers, the layer holding your product image may be labeled as something other than “Background.”
With your selection still selected, make sure the Background layer is selected in your Layers panel, and click on the four little lines in the upper right hand corner of the panel. Then, choose Duplicate Layer….
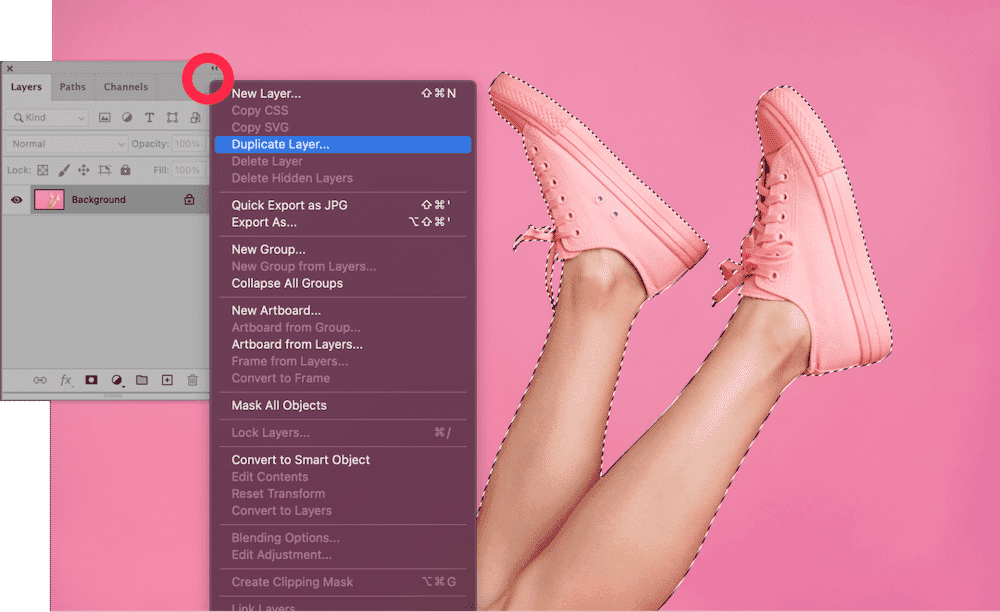
A dialog box will appear, prompting you to name the new layer. Call it something that makes sense to you, such as “Product.”
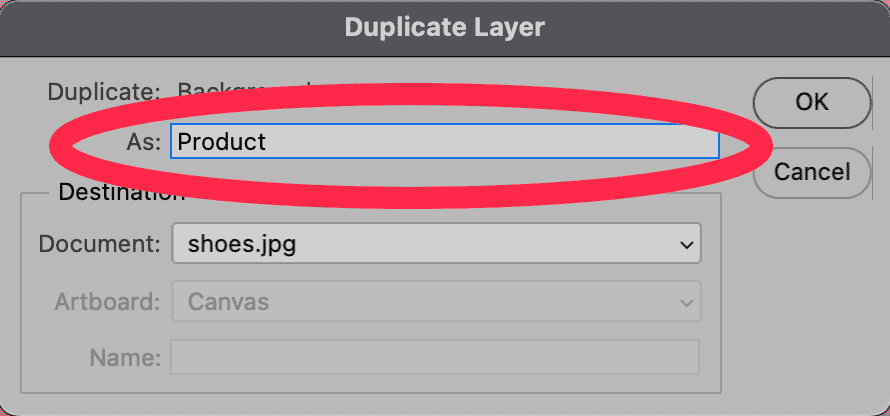
Click OK.
Back in your Layers panel, click on the new layer you just created. With your selection still selected, click on the icon at the bottom of the panel that looks like a rectangle with a circle inside of it.
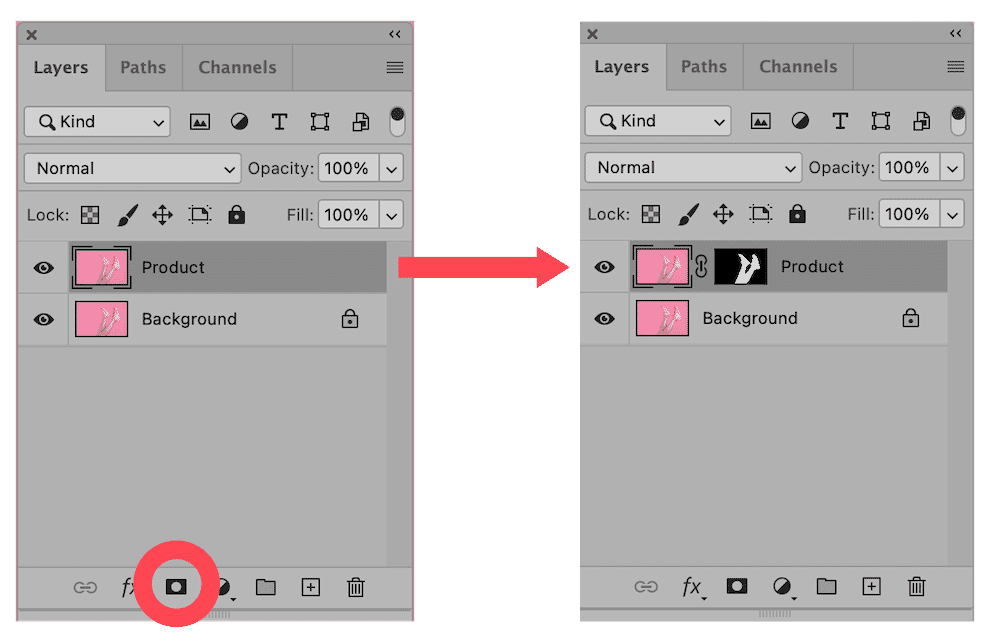
In your Product layer, you should now see a mask of your selection next to the Layer thumbnail.
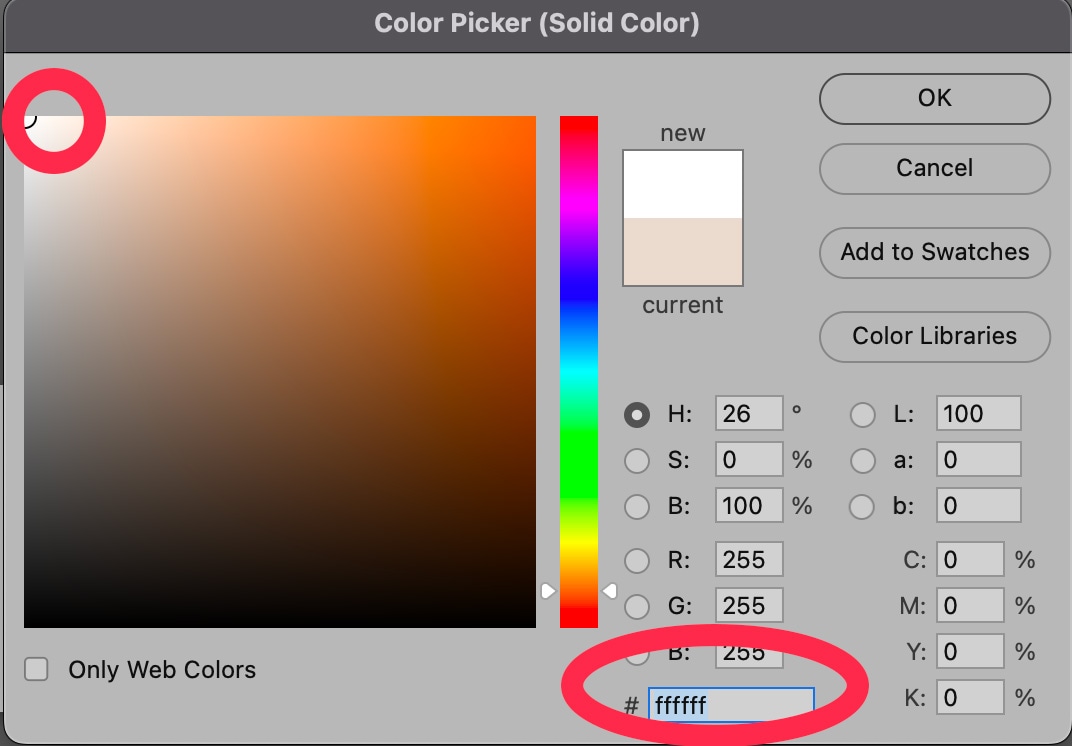
Still in your Layers panel, select your original Background layer once more. Then, create a new Fill Layer by choosing Layer > New Fill Layer > Solid Color… from the dropdown menu at the top of the application window.
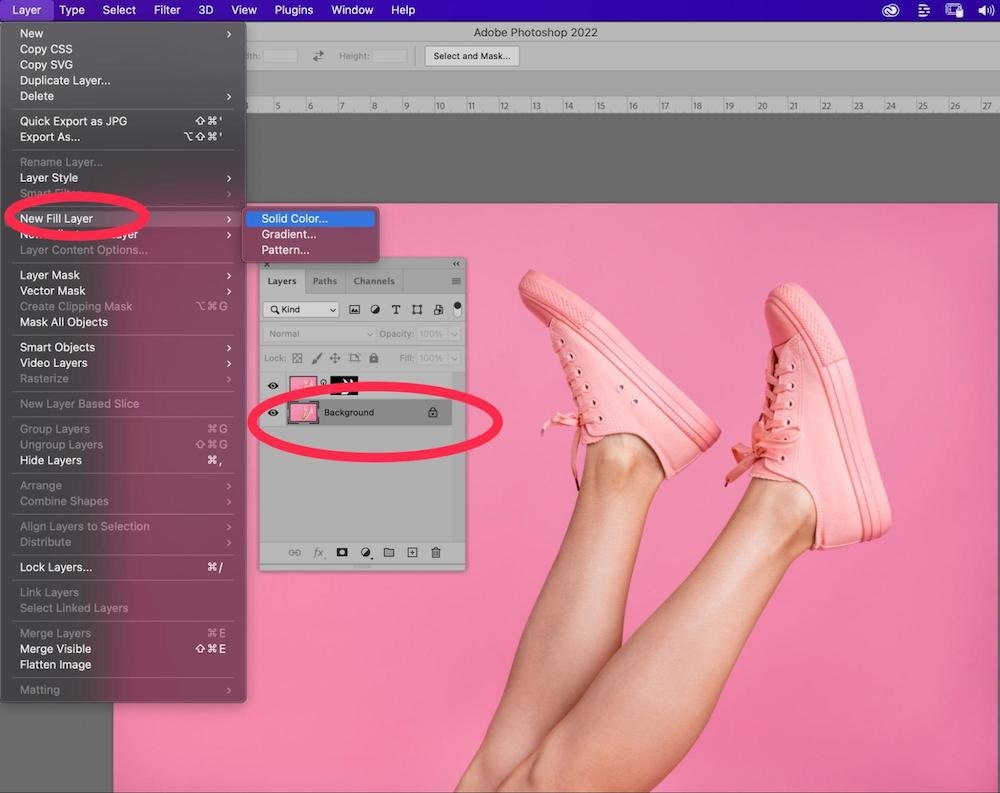
In the dialog box that appears, move the cursor to the upper left side of the color field to select a pure white.
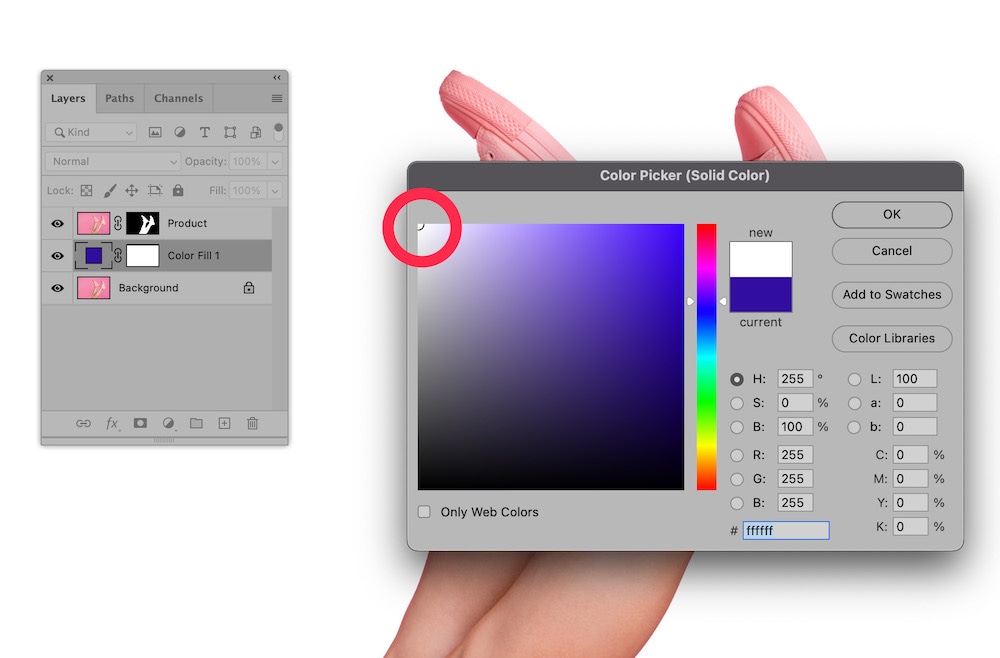
Click OK.
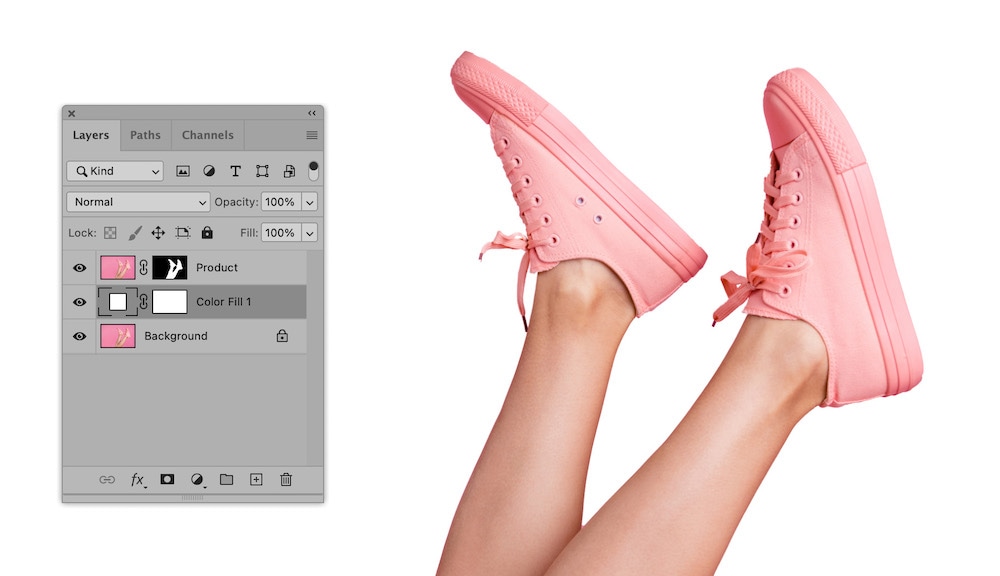
3. Add shadows and highlights
Your product image should now be on a white background. We can take this a step further to make your image look more realistic, like it was actually shot against a white backdrop.
Let’s first add a subtle shadow to our product. Select your Product layer in your Layers panel. Then, choose Layer > Layer Style > Drop Shadow from the dropdown menu at the top of the application window.
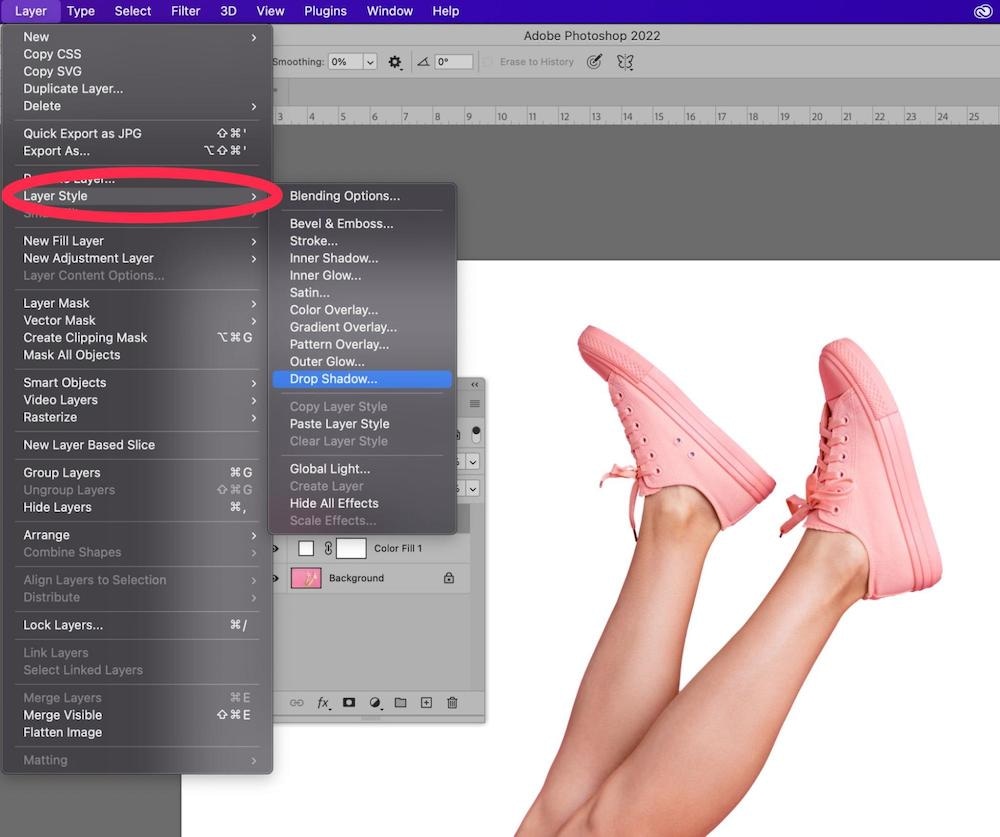
In the Drop Shadow dialog box, set the angle of the drop shadow to work with the angle of highlights and shadows in your image. Use the Distance and Spread sliders to pull the shadow away from the object so it only appears on one side. Don’t worry about increasing the size slider; we’ll blur the shadow manually next.

Click OK.
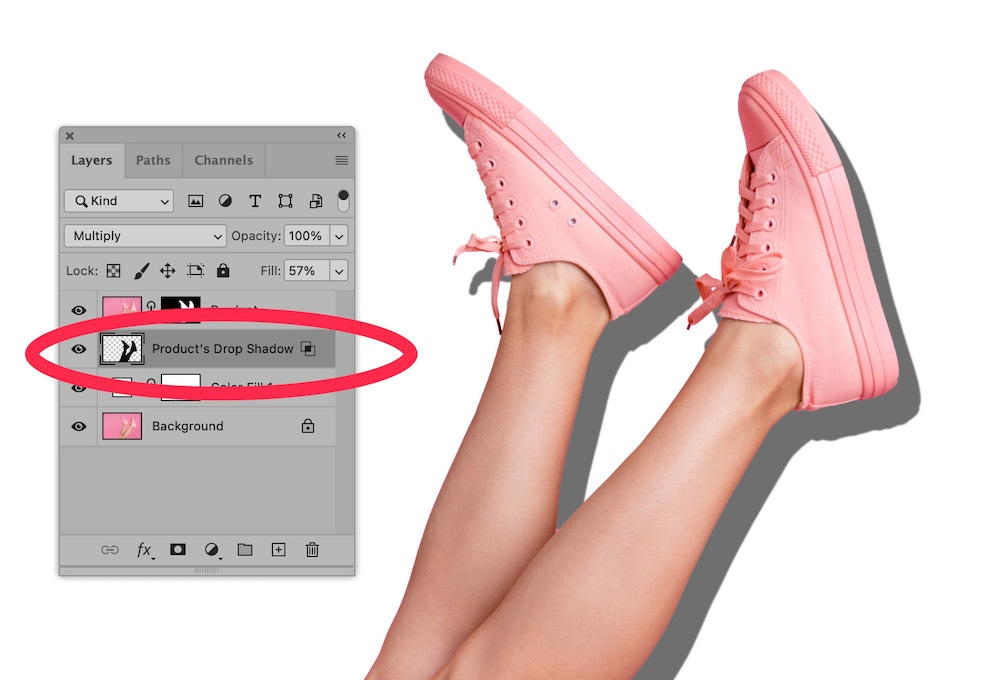
Next, we need to separate the Drop Shadow from its layer. Go to Layer > Layer Styles > Create Layer. You may get a dialog box warning you that you’re separating out the layer style. Acknowledge that yes, this is what you want to do.

After you’ve created a separate layer, you should see your Product layer’s drop shadow as its own Layer in the Layers panel. Select the Drop Shadow layer.
Go to Filter > Blur > Gaussian Blur from the dropdown menu at the top of the application window. In the Gaussian Blur dialog box, pull the blur slider to the right until you are satisfied with the softness of the shadow.
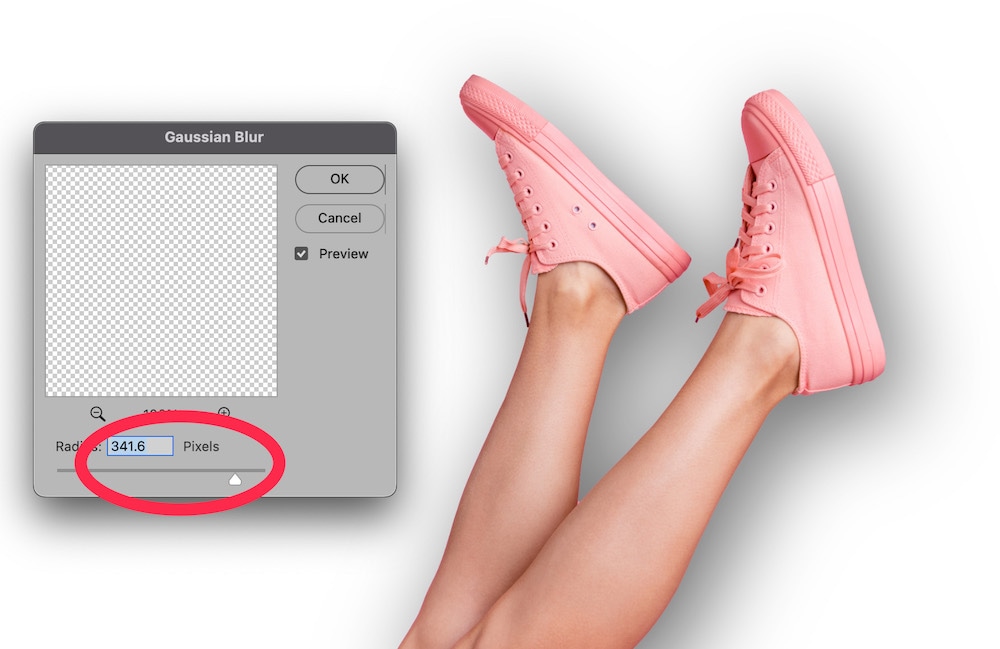
Click OK.
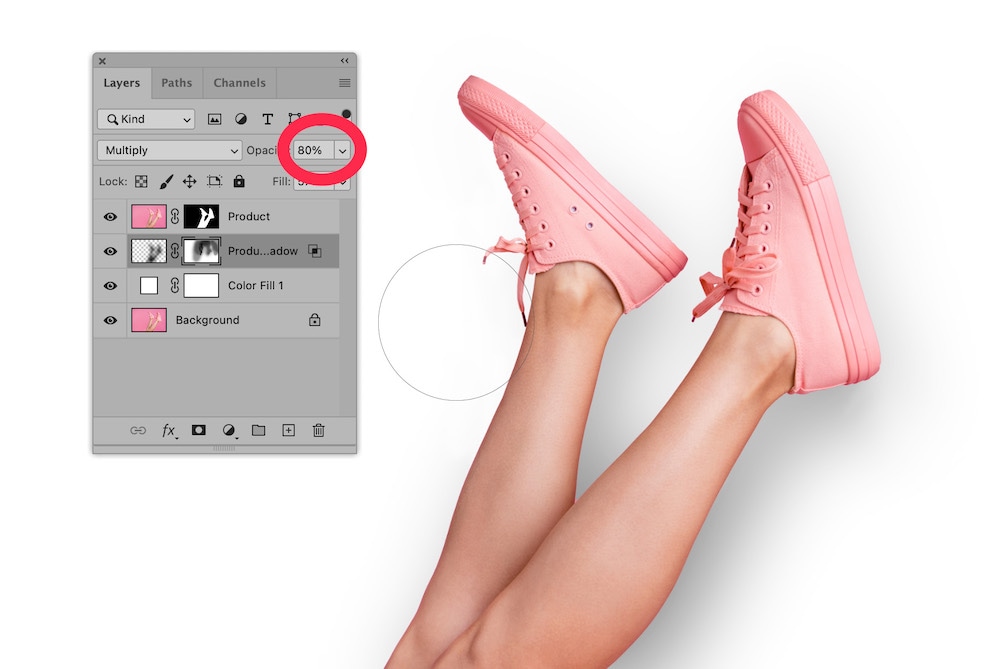
Next, choose the Eraser tool from the Toolbar and adjust it to a large soft brush. With the Drop Shadow layer still selected, carefully erase portions of the shadow. You will need to use your judgment here to determine which parts of the shadow need to be removed. Also, you may choose to create a layer mask within the Drop Shadow layer in order to perform these changes so you can “paint back” any areas you accidentally erase.
Reduce the opacity of the Drop Shadow layer so that the shadow blends into the background.
Finally, let’s add some highlights to the image to make it look as if the light from the white background is reflecting onto the product itself.
Select the Product layer in the Layers Panel. Then, create a new layer by choosing Layer > New > Layer. In the New Layer dialog box, set the blending mode to Overlay, and check the box next to Fill with Overlay-neutral color (50% gray).
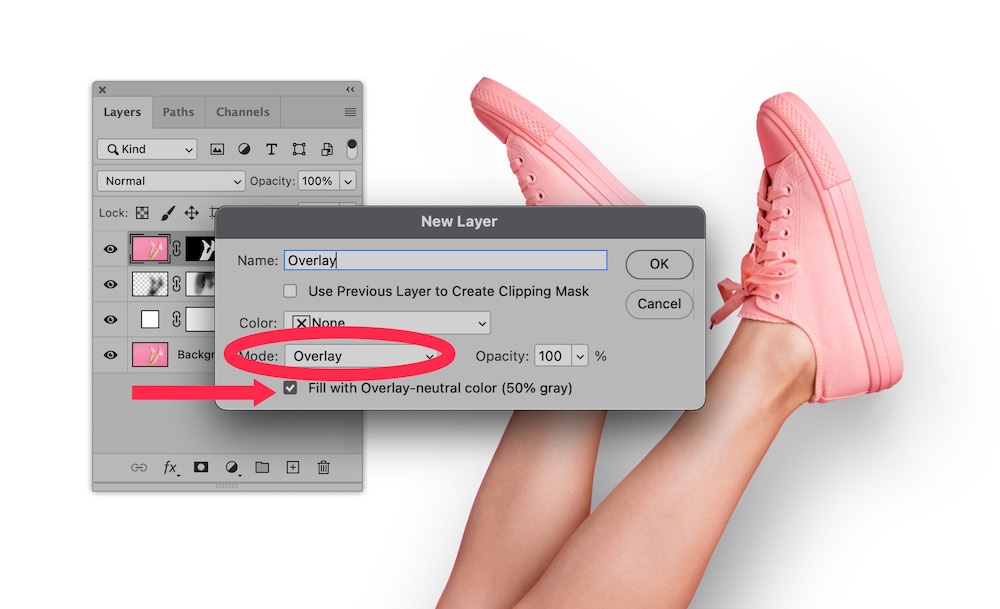
Click OK.
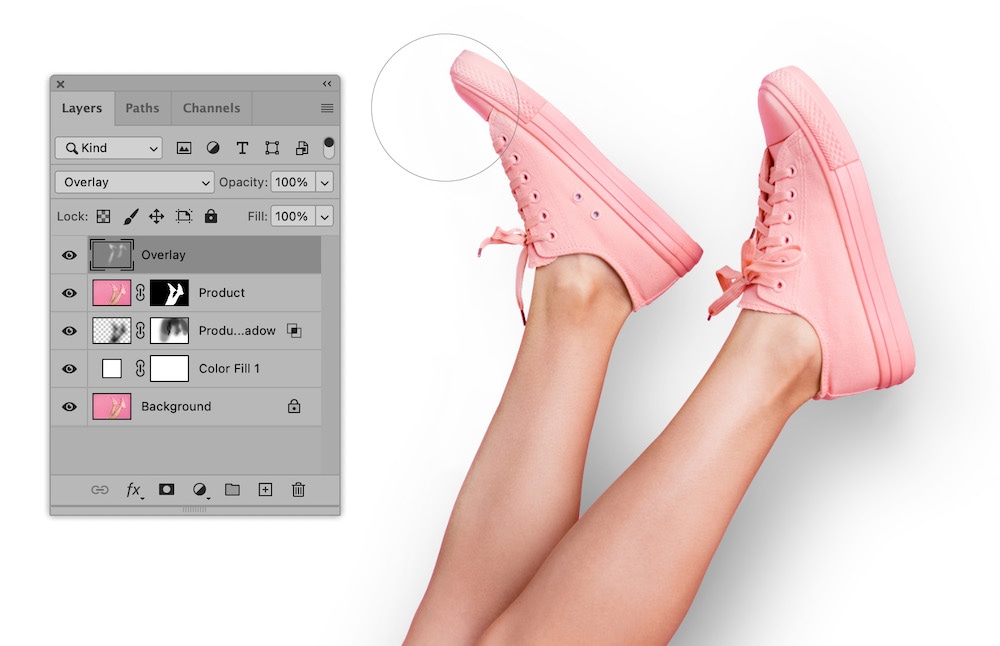
Select the new Overlay layer in the Layers panel. Then, in your Toolbar, select the Dodge Tool. It may be hiding beneath the Burn Tool.
In the Options bar at the top of the window, set your Dodge tool settings to a large, soft brush, your Range to Midtones and your Exposure to 20% or higher.

In your Overlay layer, “paint” highlights onto your image using the Dodge Tool according to how you think the light would be hitting your product image. As with the shadows, you’ll need to use your artistic judgment on how best to do this.
Once you’re satisfied with your results, hit save and bask in the glory of your amazing work.
Outsource your tricky white background edits
We handle tons of white background photo edits on a daily basis. Looking for the easiest way to get your shots web-ready? Outsource them to Path, your virtual photo editing studio—where we do every edit by hand.
FAQs about how to make a background white in Photoshop
How do I make the background white in Photoshop?
In short, the easiest way to make the background white in Photoshop is to create a selection of the object you want to isolate, mask out all other parts of the image, and place a white fill layer behind the object’s layer, as outlined in the above tutorial.
How do I white out a white background in Photoshop?
If you have a background that is already mostly white, you can convert the background to a pure white using Photoshop’s Curves function. Go to Image > Adjustments > Curves… (or type CTRL + M, COMMAND + M on a Mac). In the Curves dialog box that appears, use the white eyedropper tool under the graph and choose a portion of your background.
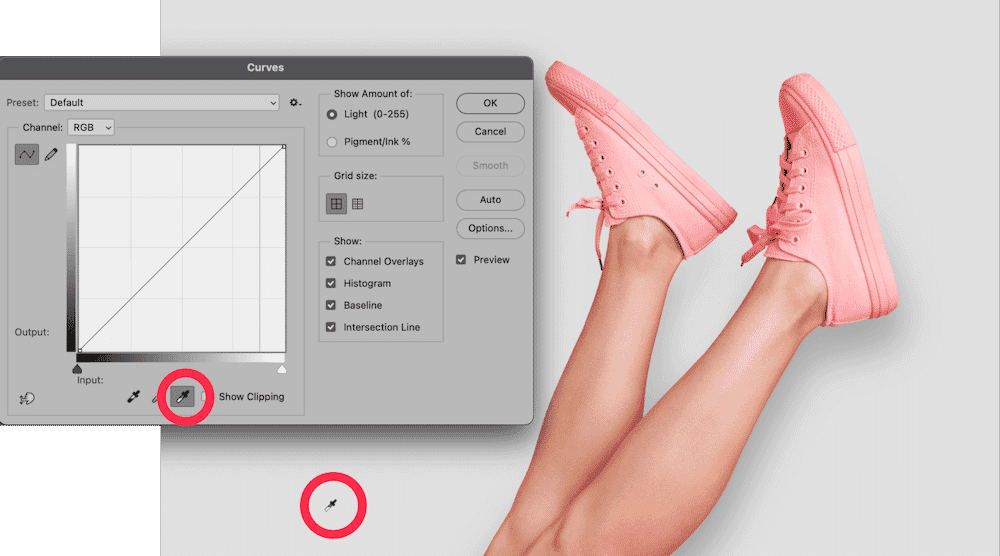
Your background will adjust itself to a pure white.
How can I change my background to white?
The easiest way to create a white background is to create a fill layer underneath your product layer (after you’ve isolated the object from the background). Choose Layer > New Fill Layer > Solid Color… from the dropdown menu at the top of the application window. A dialog box will appear, prompting you to name the layer. When the color fill box appears, move the cursor to the upper left corner of the color fill to get a pure white, or type “FFFFFF” for the hexadecimal value at the bottom of the window.
How do I make a PNG background white in Photoshop?
If you’re working with a transparent PNG, you can make your background white using the tutorial above (see “How can I change my background to white”). Open your file in Photoshop, create a solid color fill layer that is filled with white, and then move that layer so it sits under your original layer. If you save a transparent PNG as a JPG, Photoshop will convert the transparent areas of your image to white by default.